Process Snapshot
Process Snapshot
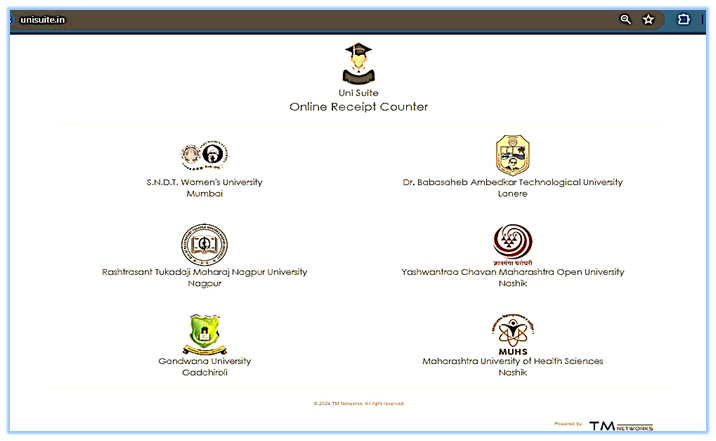
1. Go to UniSuite Website: Visit unisuite.in.
2. Select Your University: Choose your university from the list provided on the homepage.
3. Find ORC Section: Look for the Online Receipt Counter (ORC) section.
4. Generate Token: Click on "Token Generation" and fill in required details to generate a token.
5. Make Payment: Proceed to payment gateway and complete the transaction using your preferred method.
6. Get Confirmation: Once payment is successful, receive a confirmation message and receipt.
7. Logout (Optional): For security, consider logging out after completing your transaction.
Concise overview of the steps involved in using the UniSuite ORC system.
Example: Selecting respective University link for performing Student fees Payment.
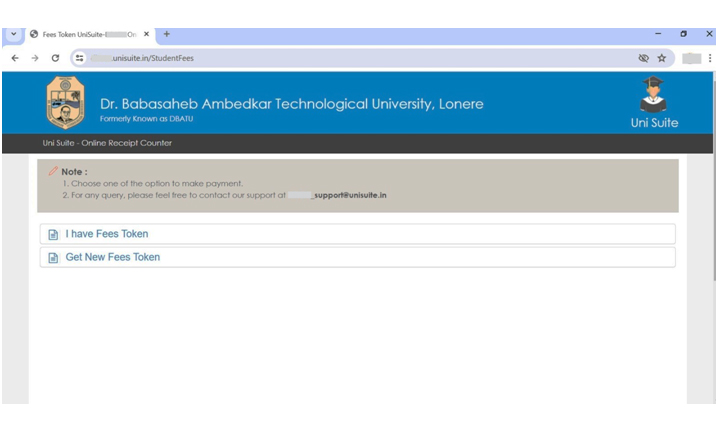
1. Go to UniSuite Website: Visit unisuite.in.
2. Select DBATU: Choose "Dr. Babasaheb Ambedkar Technological University, Lonere" from the list of universities provided.
3. Find ORC Section: Look for the Online Receipt Counter (ORC) section on DBATU's page.
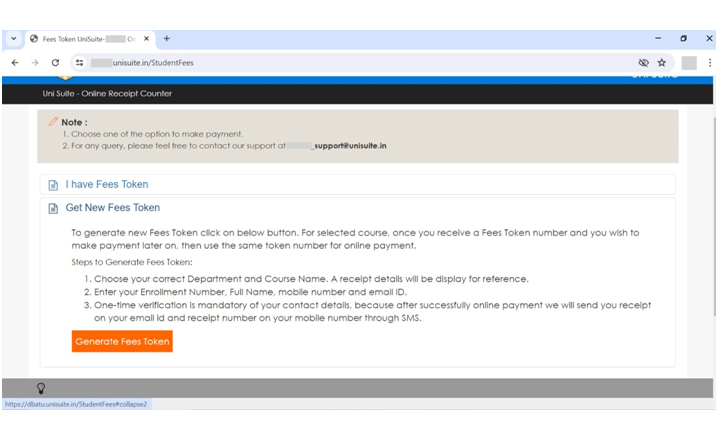
4. Choose Payment Option: You'll see two options: "I have Fees Token" and "Get New Fees Token."
5. If you already have a token, select "I have Fees Token" and proceed to make payment.
6. If you need to generate a new token, select "Get New Fees Token."
7. Make Payment or Generate Token: Depending on your selection:
8. If you chose "I have Fees Token," follow the instructions to make your payment using the token you already have.
9. If you chose "Get New Fees Token," fill in the required details to generate a new token for your transaction.
10. Contact Support (Optional): If you have any queries or issues, contact support at dbatu_support@unisuite.in for assistance.
This guide outlines the steps for accessing the UniSuite ORC system specifically for selected University (DBATU).
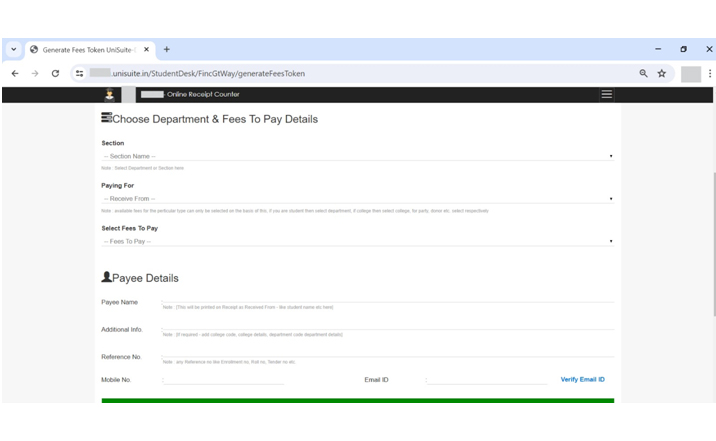
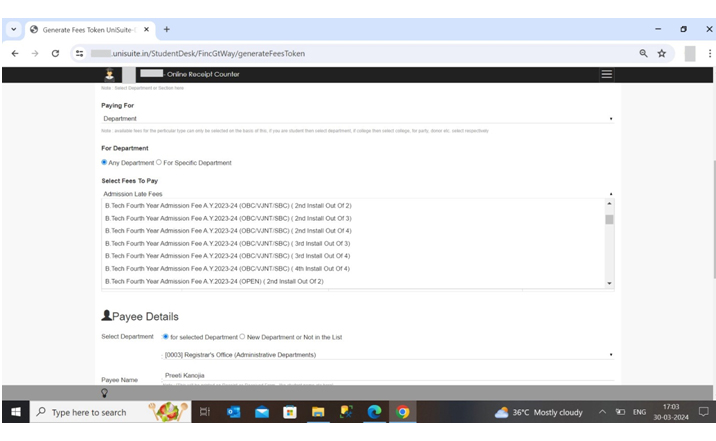
1. Choose Correct Department and Fees:
• Ensure you select the department or fees category that accurately reflects the purpose of your payment. Double-check for any specific instructions or guidelines provided by the university.
2. Verify Contact Information:
• Make sure your Email ID and Mobile Number are accurate and up-to-date. This ensures you receive timely notifications about your payment status.
3. Provide Accurate Payee Details:
• Enter the payee’s name exactly as required, ensuring it matches any official records or documentation. Include any additional information requested, such as college code or department details, to facilitate processing.
4. Reference Number:
• If applicable, provide a reference number such as your enrollment number, roll number, or tender number. This helps in tracking your payment and associating it with the correct transaction.
5. Accept Terms and Conditions:
• Take a moment to review the terms and conditions carefully before proceeding. Ensure you understand and agree to the terms outlined, as they may include important information regarding your payment and usage of the ORC system.
6. Proceed with Caution:
• Once you've filled out all the necessary details and accepted the terms, proceed to the next steps with caution. Avoid refreshing the page or navigating away during the transaction process to prevent any accidental disruptions.
By following these suggestions, you can ensure that you provide accurate and complete information when filling out the details on the next page of the selected university’s UniSuite ORC system, leading to a smoother and more successful transaction experience.
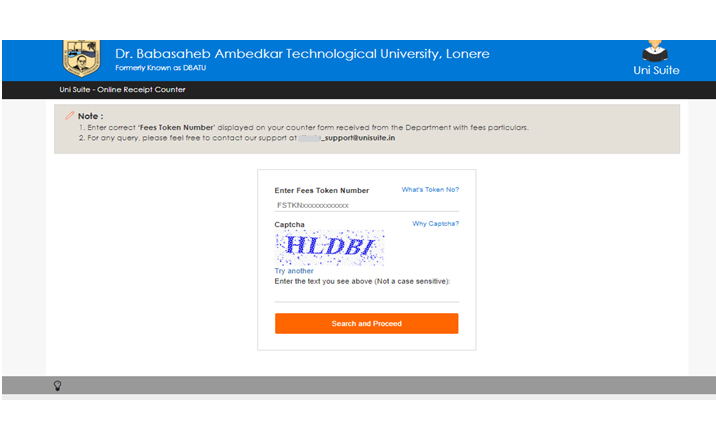
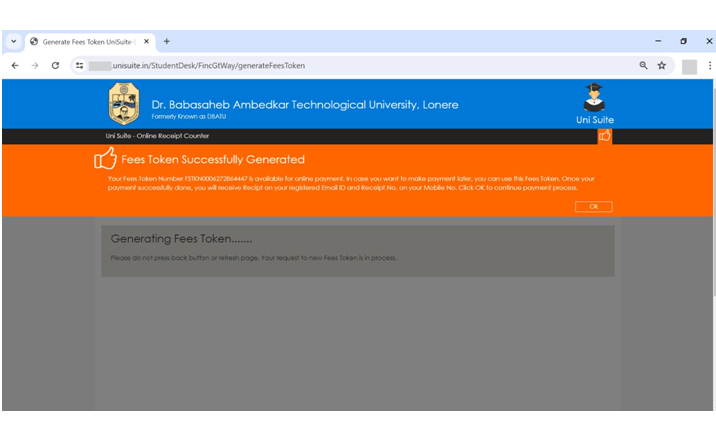
• Look for the "Fees Token Number" field on the page.
• Enter the correct token number displayed on your counter form received from the Department. For example, if the token number is "FSTKN0006857194296," input it into the designated field. 2. Captcha Verification:
• Complete the Captcha verification to ensure you're not a robot.
• Enter the text displayed in the Captcha field. This is not case-sensitive.
• If the text is unclear, you can click on "Try another" to generate a new Captcha.
3. Contact Support (Optional):
• If you encounter any issues or have queries, you can contact support at dbatu_support@unisuite.in for assistance.
By following these steps, you can successfully enter the Fees Token Number and complete the necessary verification on the Uni Suite - Online Receipt Counter page
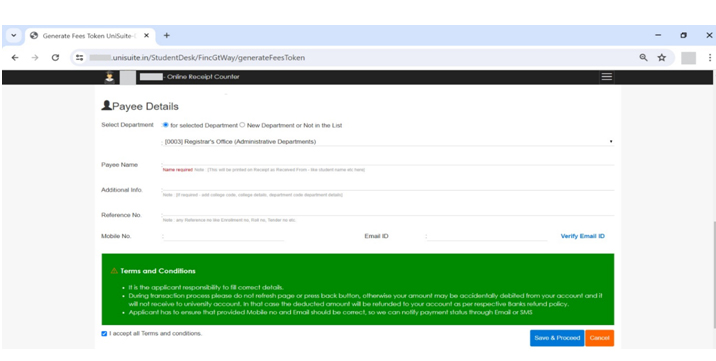
1. Enter Correct Details:
• Ensure all details entered are accurate and match the information provided on your fee payment form or notification.
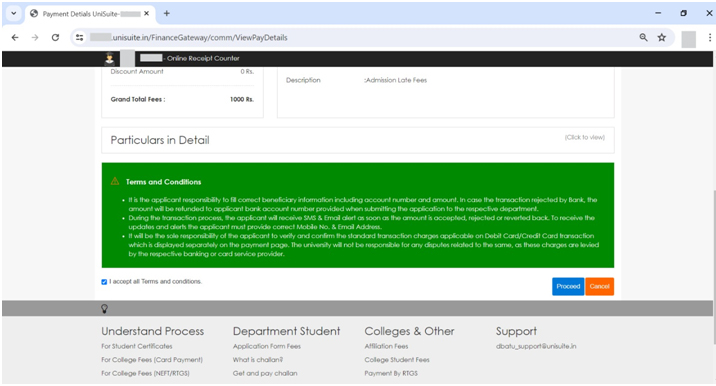
2. Payment Charges and Details:
• Review the payment summary, including the total fees, convenience charges, discount amount, and grand total fees.
• Check for any standard charges applicable for Debit/Credit Card payments, and verify the convenience fee before finalizing the payment.
3. Payee Details:
• Verify the recipient details, including the entity receiving the payment and the corresponding college/department.
• Enter your mobile number and email address accurately to ensure you receive transaction alerts and updates.
4. Description (if applicable):
• Provide additional information or description if required for the payment. This could include specifying the purpose of the payment or any relevant details requested by the university.
5. Terms and Conditions:
• Read and accept all terms and conditions before proceeding with the payment. Ensure you understand the responsibilities and liabilities associated with the transaction.
6. Acceptance:
• After reviewing and confirming all entered details, accept the terms and conditions to proceed with the payment.
7. Payment Confirmation:
• Once the payment is completed, ensure you receive a confirmation message or receipt indicating the successful transaction.
By following these steps and providing accurate details, you can successfully complete the payment process on the UniSuite - Online Receipt Counter for your selected University (DBATU here).
Example focusing on UPI payments, a popular method used by students, vendors, and colleges for various fee payments:
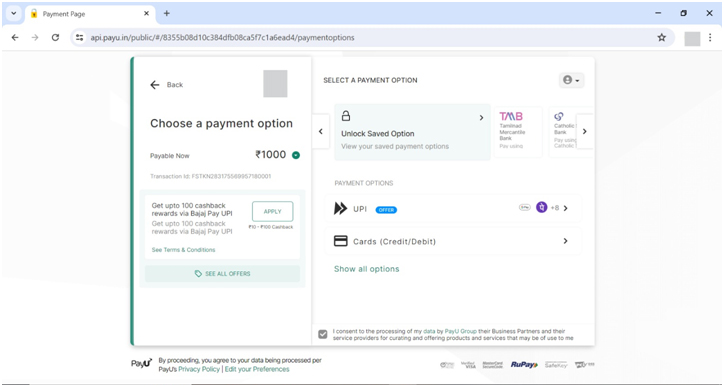
1. Review Transaction Details:
• Confirm the amount payable and any associated transaction ID.
2. Select Payment Option:
• Choose your preferred payment method from the available options such as Credit/Debit Cards, UPI, or Net Banking.
• Consider any offers or cashback rewards available for specific payment methods.
3. Provide Consent:
• If required, provide consent to the processing of your data by the payment service provider according to their privacy policy.
4. Proceed with Payment:
• Click on the option you've selected to proceed with the payment.
• Follow the on-screen instructions to complete the transaction securely.
5. Payment Confirmation:
• After successful payment, ensure you receive confirmation of the transaction.
Ensure to choose a payment method that is convenient and secure for you. If you encounter any issues or have questions, you can refer to the provided support options or contact the payment service provider for assistance
Example focusing on UPI payments, a popular method used by students, vendors, and colleges for various fee payments:
Payment Options Available in ORC:
1. UPI Options:
• Pay by UPI ID / UPI Number
• Google Pay
• PhonePe
• BHIM
• PAYTM
• MobiKwik UPI
• CRED UPIOFFER
• Amazon Pay
• Jupiter
• Bajaj FinServ OFFER
2. Card (Credit/Debit) Options:
• Card Number
• Expiry (MM/YY)
• CVV
• Name on Card
3. Net Banking Options:
• List of various banks including HDFC Bank, ICICI Bank, Punjab National Bank, etc.
4. WhatsApp Option:
• Enter UPI ID
• VERIFY
These payment options offer users flexibility in choosing their preferred method to complete transactions, whether through UPI, card payments, net banking, or WhatsApp, catering to different preferences and convenience levels.
UniSuite Branch Server & ORC Data Synchronization User Checklist
UniSuite utilizes data synchronization mechanisms to ensure the seamless exchange of information between servers and applications. This SOP provides guidelines for managing and monitoring data synchronization processes within UniSuite.
Regularly monitor server status to ensure it is online.
If offline, follow troubleshooting steps provided in the UniSuite documentation.
2. Sync Server Management:
Access Sync Server through UniSuite dashboard.
Ensure Sync Server is online for seamless synchronization.
3. Online Receipt Counter Sync Server:
Monitor for errors and pending tasks.
Stop for maintenance or troubleshooting if needed.
4. Data Backup Settings:
Verify the last backup timestamp.
Backup data as per schedule or as needed.
Configure advanced backup settings if required.
5. Error Handling:
Promptly address any errors to maintain data accuracy.
Document error resolutions for future reference.
6. Regular Maintenance:
Perform routine server updates and checks during off-peak hours.
7. Reporting:
Generate and review regular reports on synchronization performance and error trends.
8. Escalation Procedure:
Understand the process for escalating critical issues.
9. Training and Documentation:
Participate in training sessions provided.
Refer to updated documentation for guidance.
10. Compliance and Security:
Adhere to compliance regulations and security protocols during data synchronization.
11. Continuous Improvement:
Provide feedback for process improvement.
Suggest enhancements based on user experience.
Conclusion: Acknowledge understanding of the checklist and commitment to follow the outlined procedures.
 SOP-UNISUITE